
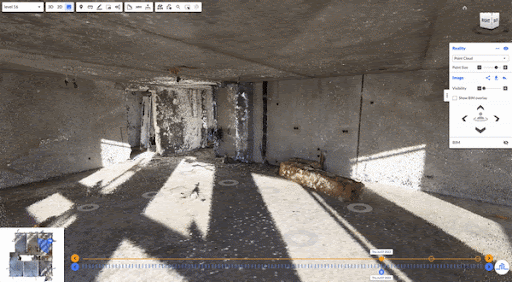
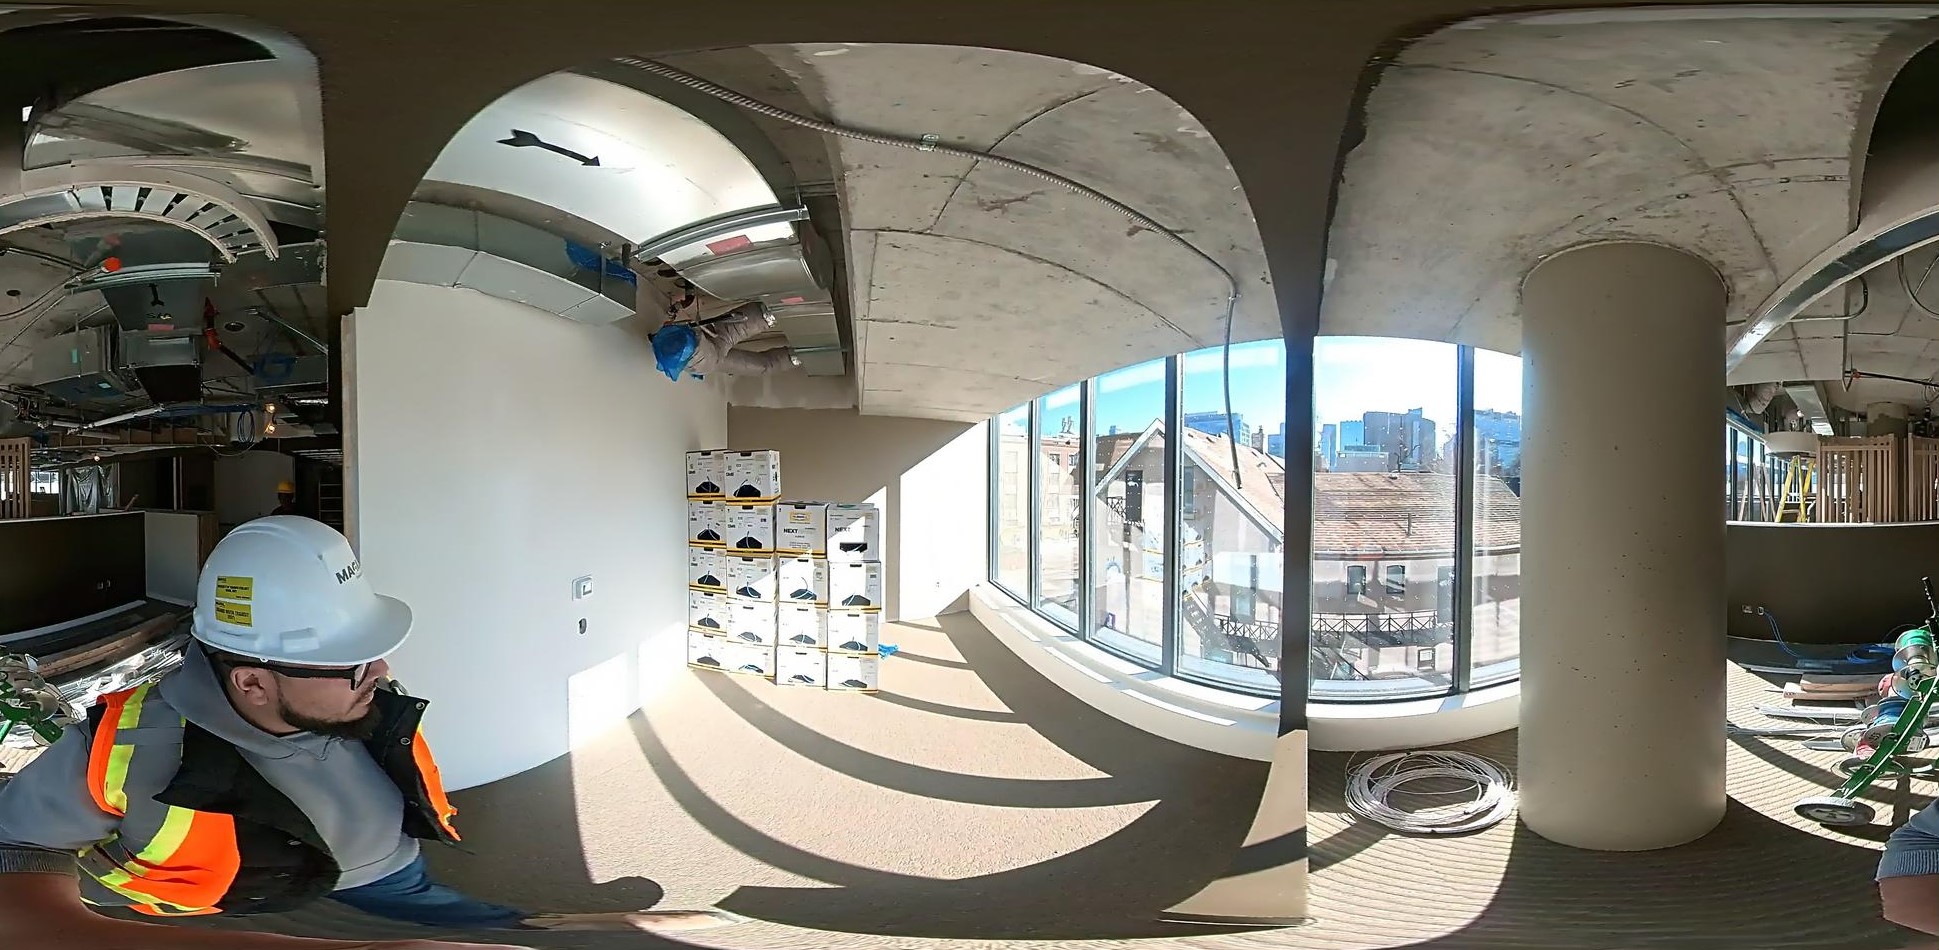
Figure 1. Start your experience using immersive 360° images instantly, while keeping the 3D point cloud in the background, readily available for measurements, markups, and more.
We are excited to introduce a new feature: Image-First Navigation Mode. Instead of viewing a point cloud within the 3D viewer when logging into your Reconstruct project, you can instantly start your experience with an immersive 360° image.
This feature is going live on 9/21/22 at Noon CT.
What are the key benefits to your team?
Image-First navigation delivers an immersive walkthrough experience. The image-first navigation mode offers a walk-through experience similar to Google street view. Now all stakeholders engaged in a project can intuitively review what is there vs. what should be there. Specifically, this navigation mode allows users to review the as-built / current conditions of their projects directly from immersive image viewpoints and compare them against the as-designed conditions. Within measurable images, users can also create markups or pin punch list items against the 3D as-built environment, while keeping 3D point clouds and mesh models within the 3D viewer.
More efficient site reviews with teleporting and time-travel capabilities. Image-first navigation mode offers an intuitive interface for reviewing the coverage of reality mapping in space and over time. It also allows users to easily travel from work area A to work area B, and compare before-vs.-after changes from any desired viewpoint.
What is included:
(1) Choose your default navigation mode. Select the new image first navigation mode in Account Setting by selecting Image instead of 3D or 2D.
You can enable this option in each project in the project viewer. You can do so by clicking your name in the upper right-hand corner > selecting "Edit User Profile" > Toggling on "IMAGE" (as shown below).
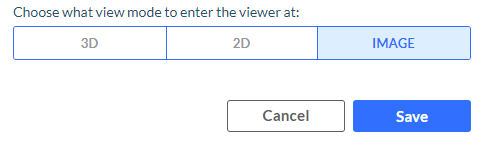
Figure 2: Choose your default navigation mode by changing your account settings.
(2) Image-View Tours
Navigate between images using the navigation map, on-screen donuts, or keyboard arrow keys. The improved navigation map –placed on the left corner of the viewer– delivers a comprehensive view of all of your reality capture data, including both measurable images that are associated with point cloud data, as well as the 360° and perspective images that are pinned against floor plans.
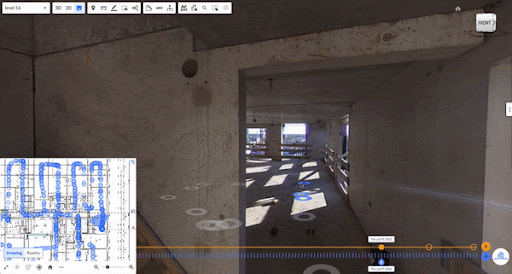
Figure 3. Immersive tours! Easily and quickly travel in space and over time, using measurable images.
(3) Teleport
A more intuitive way of teleporting is added to your favorite project location dropdown menu! Open up your location dropdown menu on any given date on the calendar to immediately see an orange markup next to each work area where reality capture and/or reality mapping is available on your project.
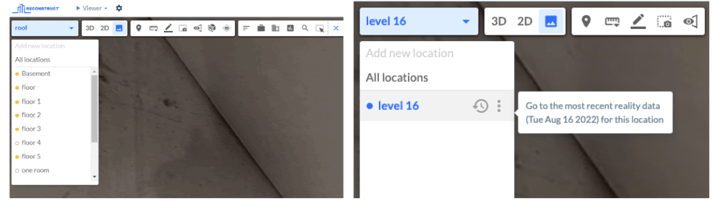 Figure 4. Review coverage of your reality capture across various work areas on each calendar date, using a more intuitive location breakdown structure.
(4) Time-Travel
We have added a new button on each work area under the location dropdown structure menu so you can time-travel to the most recent reality capture of that location. You can also click on the timeline slider to time-travel to other dates. A new visualization mode is offered to clarify the types of data that is available on any given calendar date.

Figure 5. Time travel is made easier. Review your work locations, directly travel to the most recent capture of each location, and review your timeline better than before!
We’re excited to see this feature put into use in the field for inspecting and managing projects and physical assets. For more information on this new feature, please review the Walkthrough Guide, made available under Reconstruct viewer in the lower right corner. And don’t forget to turn this feature on using your Account Settings!
Want to learn how Reconstruct can help your project?
Visit www.reconstructinc.com or request a consultation with one of our team members via support@reconstructinc.com.
Related Posts
Generate Cleaner 360 Site Captures with Reconstruct’s Image Enhancer
Generate Cleaner 360 Site Captures with Reconstruct’s Image Enhancer
.png)
Reconstruct adds Structured .e57 Point Cloud Import
Reconstruct adds Structured .e57 Point Cloud Import to the Visual Command Center: All Forms of Reality Capture Can be Viewed with a Consistent Image-based...
Reconstruct's 2D3D RMap™ Goes Global
Reconstruct, the leader in remote construction progress monitoring in North America, is also the leading solution used by global construction teams across...